This article is for CCBoot v2.1 only. For CCBoot v3.0, please refer to "Disk Cache Settings and Recommend" in wiki.
Server Cache
There are 2 types of cache for CCBoot server - RAM cache and SSD cache.RAM Cache on Windows 2003
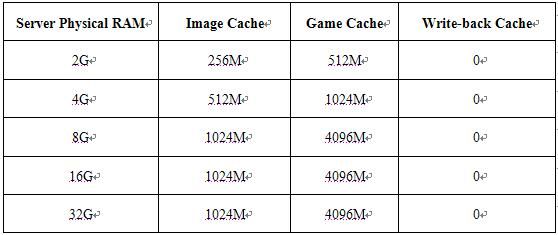
Different system will use different cache policy. If install CCBoot server on the Windows Server 2003, please use the following settings.


Figure 1

Figure 2
RAM Cache on Windows 7
If you use Windows 7, please choose 64 bit OS and install CCBoot server 64-bit version.Make sure you have enabled the "Enable write caching on the device" for every disk. Click Start, right-click Computer and select Properties.
- In the left panel, click Device Manager.
- Expand Disk Drives and right-click on one of the disks.
-
Click the Policies tab and check "Enable Write Caching on the device" and "Turn off Windows write-cache buffer flushing on the device" to enable.

Figure 3 - Press "OK" to save.
- Implement step 3 - 4 for other disks.
RAM Cache on Windows 2008
If you use Windows 2008, please choose Windows 2008 64-bit R2 and install CCBoot server 64-bit version.Make sure you have enabled the "Enable write caching on the device" for every disk. Click Start, right-click Computer and select Properties.
- In the left panel, click Device Manager.
- Expand Disk Drives and right-click on one of the disks.
-
Click the Policies tab and check "Enable Write Caching on the device" and "Enable Advanced Performance " to enable.
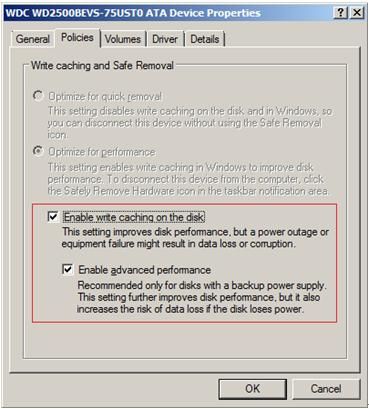
Figure 4 - Press "OK" to save.
- Implement step 3 - 4 for other disks.
SSD Cache
If you have an SSD, we recommend you enable the SSD cache function of CCBoot. SSD cache is almost used for image cache and game disk cache, which can bring you a better performance. It will speed up client booting and games loading. We recommend you format the SSD as one drive.

Figure 5
Check "Enable SSD Cache" and specify the "SSD Path" as it’s showing in Figure 5, "G:\" is the SSD drive letter.
Suppose the SSD is 60GB, please reserve certain SSD space, and then allocate the rest (suppose about 58GB) for SSD cache. The recommended SSD cache settings are as bellow.

Figure 6
The rest are for Game disk, such as F:\.
Client Cache
Comparing with server cache, the client cache is only RAM cache.
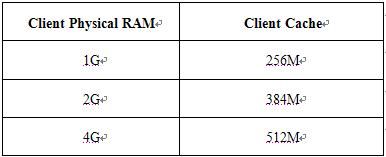

Figure 7
All new added client PCs can load the client cache settings from here.
If you want to apply this client cache setting for exist clients, please press the "Apply to All Clients" button and choose "Yes" when you get the window as bellow.
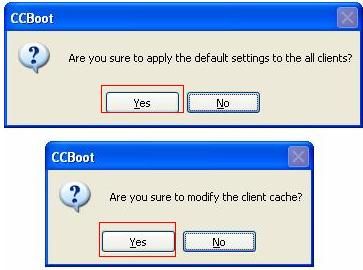
Figure 8
There’s another way to specify client cache separately for every client. On CCBoot server, select a single client from the client list and double click it to open the "Client Properties" window as bellow, then set the client cache size manually here.
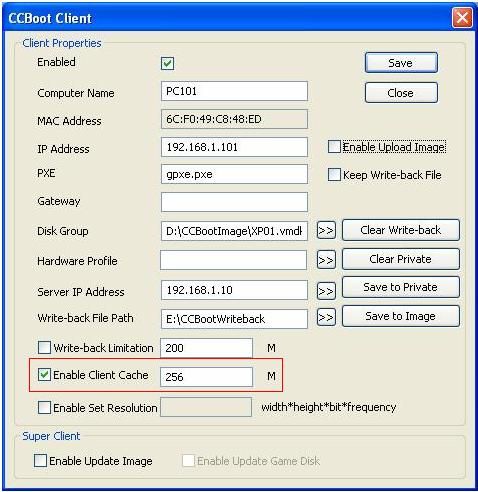
Figure 9
Sometimes, the client cache will cause blue screen when boot Windows. You can fix it by three methods.
Method 1 - Reduce the client cache size. If still failed, try method 2.
Method 2 - Disable the client cache.
Method 3 - Reinstall CCBootClient with select "Start Cache After Login Windows".