Wiki Home Troubleshoots Clients Cannot Connect to the Internet
Clients Cannot Connect to the Internet
2019/12/10 16:42
Notice: This wiki is for the old version CCBoot. Please click HERE to access the new version wiki
Problem:
If you encounter the problem that the client PCs cannot connect to the Internet,
Scenario 1. This may due to multiple IPs in the client from different DHCP services in the network, especially due to DHCP service in Router.
Solution: Please disable other DHCP services and set IP of the client to be Static in superclient mode (new versions only)
Scenario 2. The client has multiple network showing in network sharing center.
Solution:
a. Enable one client to be superclient.
b. Download and install latest version available from our website.
c. Set the IP of the client to Static.
d. If the client still has cannot connect to internet, then you need to install a windows update.
For Windows 7 64 Bit install "Windows6.1-KB2727330-v2-x64.msu" update package.
For Windows 7 32 Bit install "Windows6.1-KB2727330-v2-x86.msu" update package.
Note: You can find these file in the CCBoot Client folder.
e. Once installed, restart the client and you will see the client only has one LAN and internet as well.
f. Turn off the client and save the super client data
Scenario 3. Client does not have multiple IP or multiple network but still cannot connect to internet.
Solution: Please check and make sure that the Gateway IP and the DNS address are set correctly.
Solution:
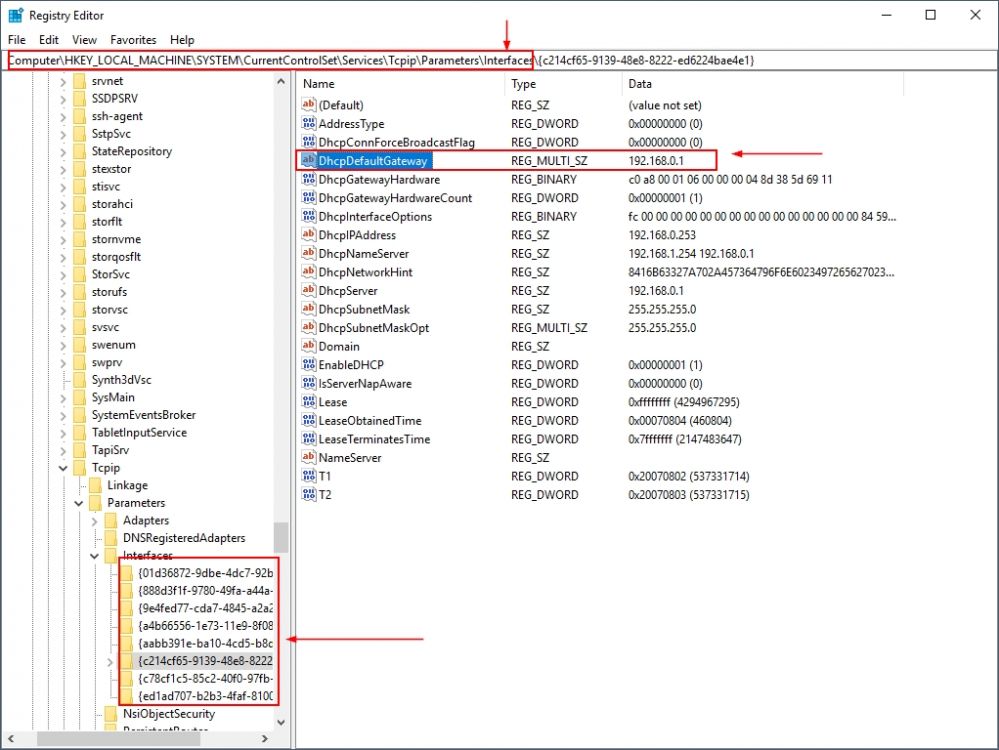
1. Boot your cilent computer in super client mode, and then open Registry editor and go to the key below
Computer\HKEY_LOCAL_MACHINE\SYSTEM\CurrentControlSet\Services\Tcpip\Parameters\Interfaces
2. Now, look for the interface on the left that has the "DhcpDefaultGateway" parameter (Figure 1).

Figure 1
3. Now, change the value on the "DhcpDefaultGateway" to match your Router's gateways IP address.
4. Restart the client and the client should have internet now.
Problem:
Diagnostic Policy Service Cannot Start: Access is Denied (Windows10/8/7)
Solution:
To resolve the "Diagnostic Policy Service Cannot Start: Access is Denied" issue, is to add the 'Network Service' & 'LOCAL SERVICE' objects to Administrators group. To do that:
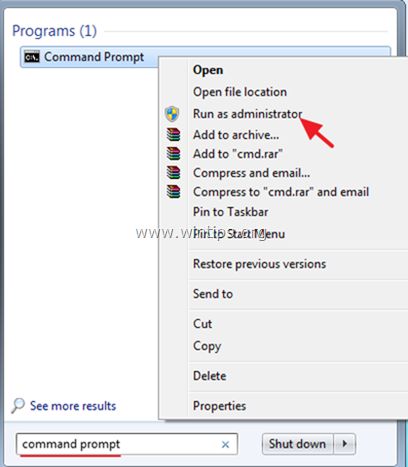
1. Open Command Prompt as Administrator. To do that:
a. In the Search box type: cmd or command prompt
b. Right click on the command prompt (result) and select Run as Administrator.

2. In command prompt type the command below and press Enter:
- net localgroup Administrators /add networkservice

4. Then type the following command and press Enter:
- net localgroup Administrators /add localservice

5. Reboot your computer.
