For more information, you can also refer to "MS DHCP" in CCBoot v3.0 Wiki.
Server Configuration
- In your Windows 2003 Server open the "Manage Your Server" wizard and click "Add and Delete Role" click "Next", select the "DHCP server" then click the "Next"button.
- Click Next to Install DHCP server and to run the New Scope Wizard to configure a new DHCP scope.
- Click Next button when Scope wizard appear then type the Scope Name.
- Please define the address range assigned by the Scope, for example, 192.168.2.100-192 .168.2.200 you need to input according to your own. Please input also the excluded IP address range, and then input the IP that you need to remove.
- Input the Lease Duration that how long a client PC can use an IP Address in this Scope.
- Click Next to Configure your DHCP Server.
- Please input your Router’s Default Gateway, *as 192.168.2.1 to be use in this Scope then click Next.
- Input your Domain name and DNS server name.
- Input your Wins Server Name and IP Address then click Next to activate.
- In Windows 2003 Server please click "Star Menu"->Administrative Tools then run DHCP.
- Click on scope options; Right-click to the left margin, select "Configuration Options"; and put check to 003 Router, 015 as your DNS, 066 to start the Boot Server Host name and enter the server IP (that is, the machine's IP); Please put check also to "67"to start the Boot file name (gpxe.pxe).
- After a client open, open DHCP address leases as shown in Figure 1-1, right-click on the empty space on the right side select export list to 001.CSV (make sure to select CSV format). List open 001 to be able to get MAC address of each client. Then import the exported list of 001 inside the CCBoot. Specific action is, after opening the CCBoot main interface click Setup, press import user, then select 001.csv.
-
Import the exported list in CCBoot Server. Please follow the below Instructions.In CCBoot Server click on the main interface and click "tools", select "import user"choose 001.csv then click OK.

Figure 1-1
-
Click on Start - Administrative Tools - DHCP; click start button then DHCP server interface will pop up, expand the DHCP then right-click reservations as shown in Figure 1-2.

Figure 1-2
-
Click on the "New Reservations"filled with CCBoot corresponds to one by one IP and MAC address as shown in Figure 1-3.

Figure 1-3
Note: To retain each client, the MAC Address can be found to export list 001.csv
On CCBoot server click "Options"click "DHCP"settings tab then uncheck "Enable DHCP"For CCBoot Configuration please refer to http://cn.ccboot/download.htm user manual
Method of using SolarWinds
SolarWinds free TFTP Server is a multi-threaded TFTP server commonly used to upload and download executable images and backup configurations for routers and switches. TFTP Server is the most robust, widely-trusted, and easy-to-use free TFTP solution available.
IF you want to enable other TFTP for example is "SolarWinds"You have to disable also "CCBoot TFTP"to avoid conflict.
- Open CCBoot "Options"main settings click "DHCP"settings tab and uncheck "Start TFTP"
- Go to our website to download two files (gpxe.pxe; newip.cfg).
-
Good Solarwinds should be installed, download the two files into the directory C: \ TFTP-Root, shown in Figure 1-4.

Figure 1-4
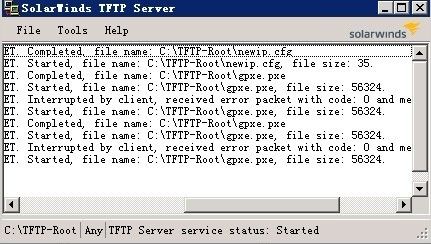
Paste the two files into the appropriate directory (gpxe.pxe and newip.cfg) then start SolarWinds.And it run as shown in figure 1-5.

Figure 1-5
