Wiki Home Client Manager Client Properties
Client Properties
2020/03/17 23:37
Notice: This wiki is for the old version CCBoot. Please click HERE to access the new version wiki
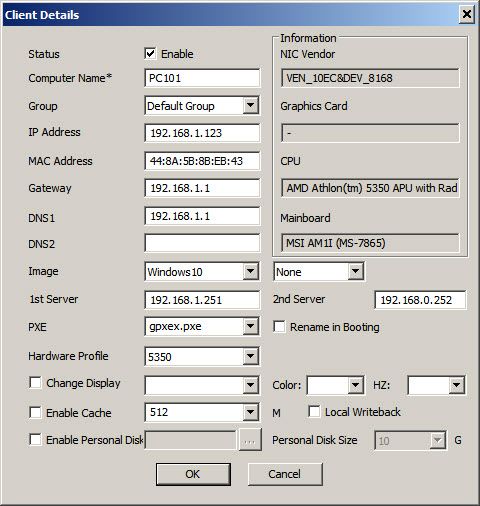
You can "Right Click" and choose “Edit Client” or “Double Click” the client in the client list on the CCBoot interface to open "Client Details" dialog box.

Figure 1
Enabled: Client PC is enabled for diskless booting.
Computer Name: Client computer name.
Group: Define the user group that the client belongs to.
IP Address: IP address that gets from CCBoot Server.
MAC Address: MAC address of the client information.
Gateway: Gateway of the router for internet access and connection
DNS1: 1st DNS IP for internet connection
DNS2: 2nd DNS IP for internet connection
Image: Assign Images to the clients.
Note: you can assign only two boot image, for more please use multiboot pxe option and customize the boot file.
Note: Please do not use older version (3.0 version and older) image in new version CCBoot or user image created in new verison in older version CCBoot as it lead to client not booting or other boot issues.
1st Server: The IP address of the boot server. If more than one server, you can input more IP address of the server on the 2nd Server field.
2nd Server: The IP address of the 2nd boot server if you have a load balance server running.
PXE: Specified PXE file name. The default value can support most of the network card. Note: It would be better to use "gpxe.pxe", but if you cannot diskless boot the client via using "gpxe.pxe", you can try to change the PXE value to "gpxe0.pxe". If this doesn't work, please modify the value to "gpxex.pxe". If you can successfully use“gpxe.pxe" in CCBoot 20120817, but failed to use it in the new build,please try ”gpxe1.pxe". From CCBoot v3.0 Build 20130710,"gpxe1.pxe" means "gpxe.pxe" of 20120817. If Realtek 8111E NIC has blue screen problem, you can try to change the PXE value to"ipxe.pxe
Hardware Profile: To set the client hardware configuration profile.
Change Display: If your Client has multiple monitors the resolutions can setup individual client's resolution. 1st is "Resolution", 2nd is "Colour Bit" and 3rd is "Refresh Rate". All fields need to be filled in order for it to be applied properly. You can set them using the drop down or enter custom resolution and other values manually as well. If any field is empty the settings will not be applied and it will default to blank.
Enable Cache: Setting the memory to use as a client cache, is depending on the client's memory size. Example: client RAM is 2GB; you can set the 256M to use as a cache.
Enable Personal: Allow you to assign personal disk to the client. Please refer Use of Personal Disk for further information.
Note: After you set the personal size, you cannot change it any more. You will have to uncheck the"Enable Personal Disk", then delete the personal disk file.After that you can reset personal disk of you require size.
