Wiki Home Create Boot Image Create Linux Boot Image
Create Linux Boot Image
2020/08/15 00:26
Notice: This wiki is for the old version CCBoot. Please click HERE to access the new version wiki
Linux is an open source OS and is widely used in educational sectors, server sectors for being free as well as versatile and easy to use.
So lets create a CCBoot image for such OS. Here we have CentOS
Note this procedure is best done on CentOS 6.0 and higher
1. Let's create an virtual harddisk to use for our CentOS installation.
2. Open "Disk Management" and the click "Action" menu and choose "Create VHD" (Figure 1)
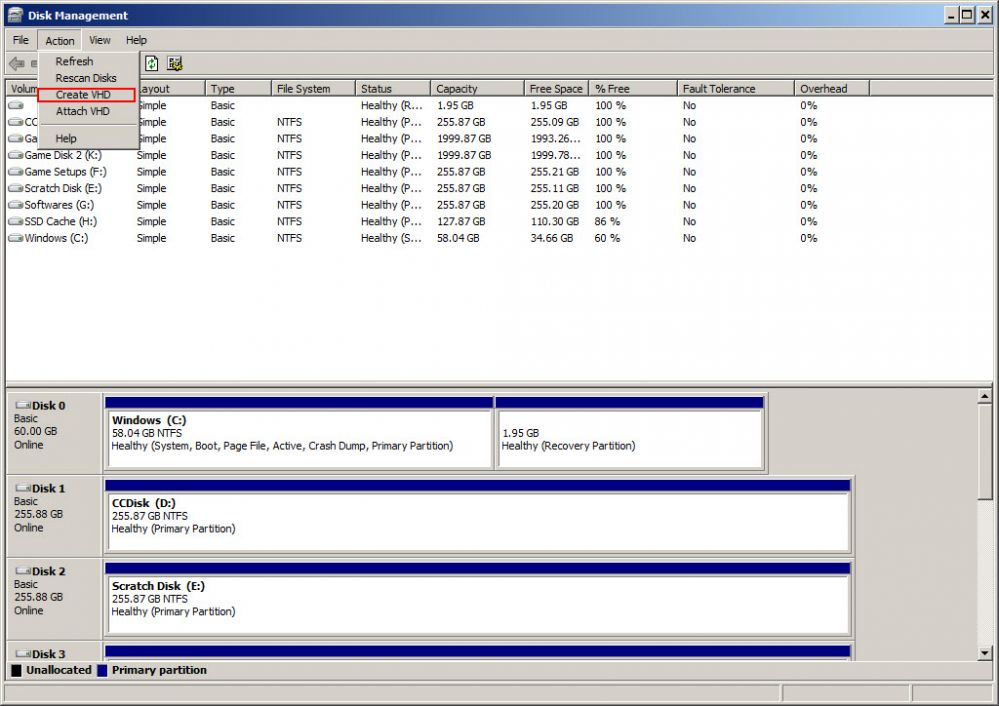
Figure 1
3. Click the "Browse" button on the "Create and Attach Virtual Hard Disk" window and choose the directory to store the image i, here we store it in H:, give the disk a name and then click "Save" button (Figure 2)
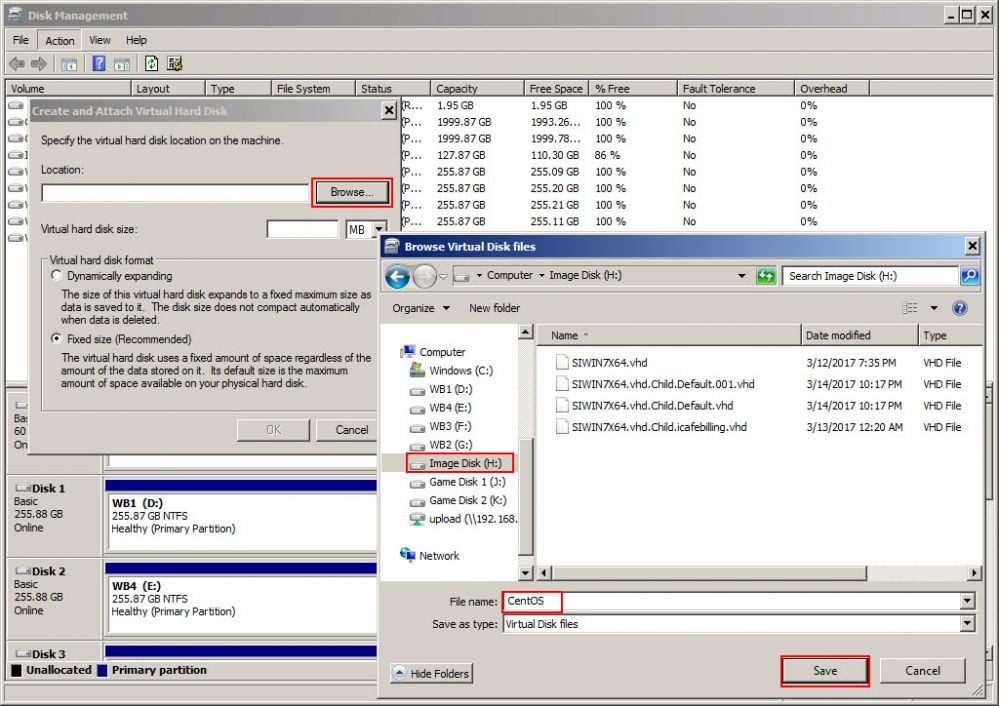
Figure 2
4. Now, on the "Create and Attach Virtual Hard Disk" window, enter the desired size of the virtual hard disk and then select the "Dynamically Expanding" option. Click "OK" to create the virtual hard disk (Figure 3)
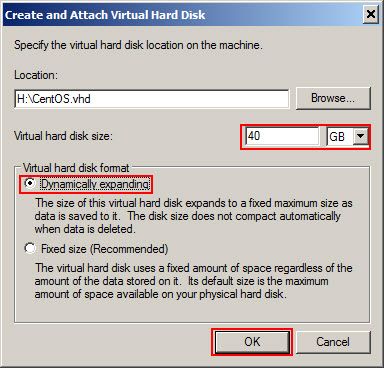
Figure 3
5. Once created, it will be automatically mounted to the system. Right click the disk and choose "Detach VHD" (Figure 4)
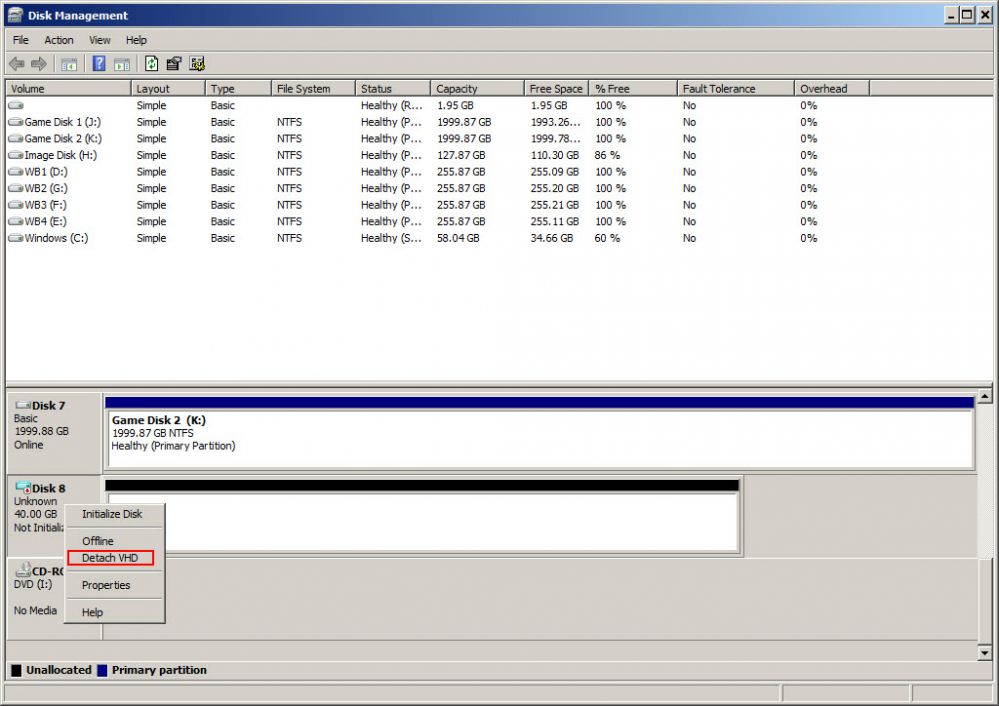
Figure 4
6. A prompt window will open "Detach Virtual Hard Disk", click "OK" to close it (Figure 5)
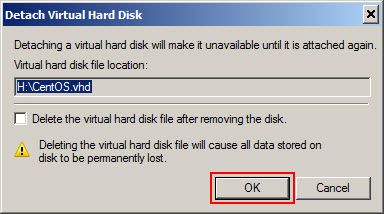
Figure 5
7. Now, open CCBoot UI, and on the "Image Manager" click the "Add Image" button. On the "Image" window, click "..." button and select the previously created virtual harddisk, then click "OK" button (Figure 6)
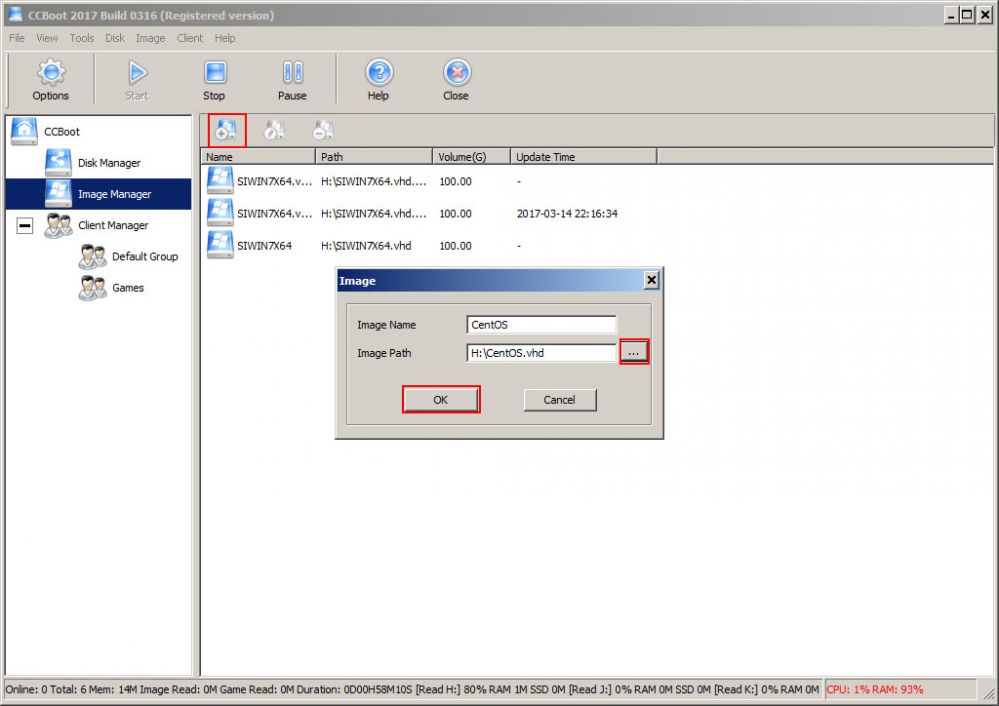
Figure 6
8. The image will be listed in the CCBoot "Image Manager" (Figure 7).
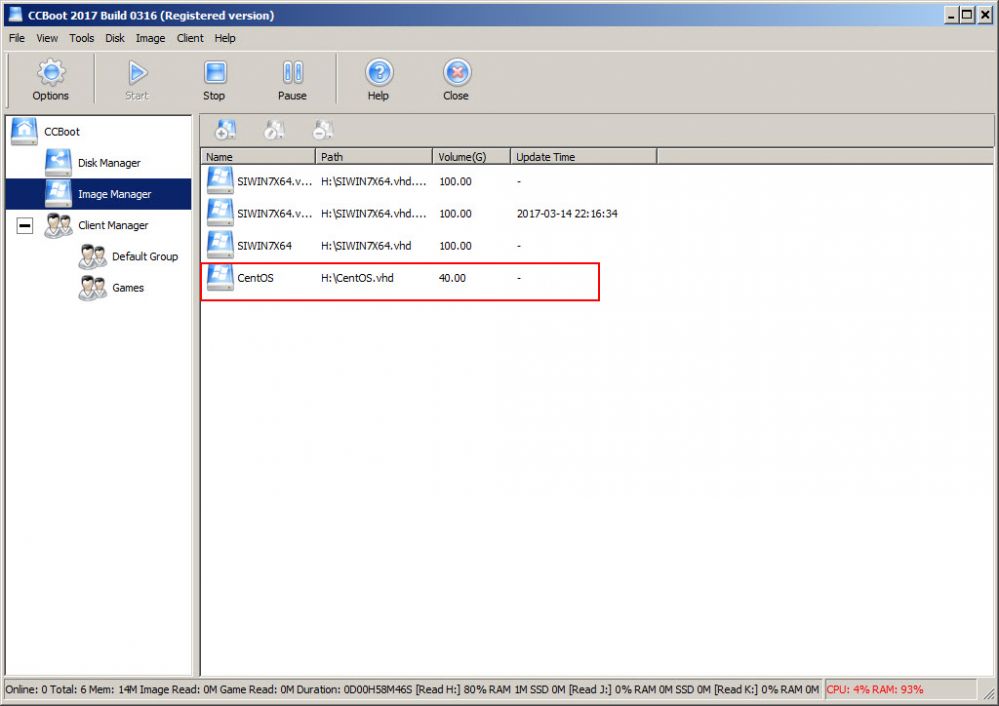
Figure 7
9. Now, open properties of a client and then assign the "CentOS" image to it, click "OK" to save (Figure 8).
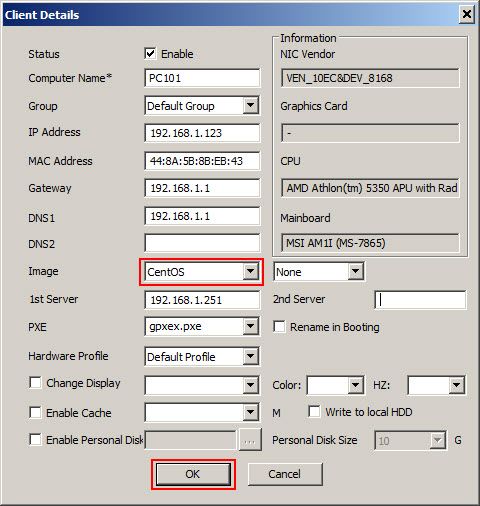
Figure 8
10. Now, right click the same client and click "Enable Superclient" to make it a super client (Figure 9).
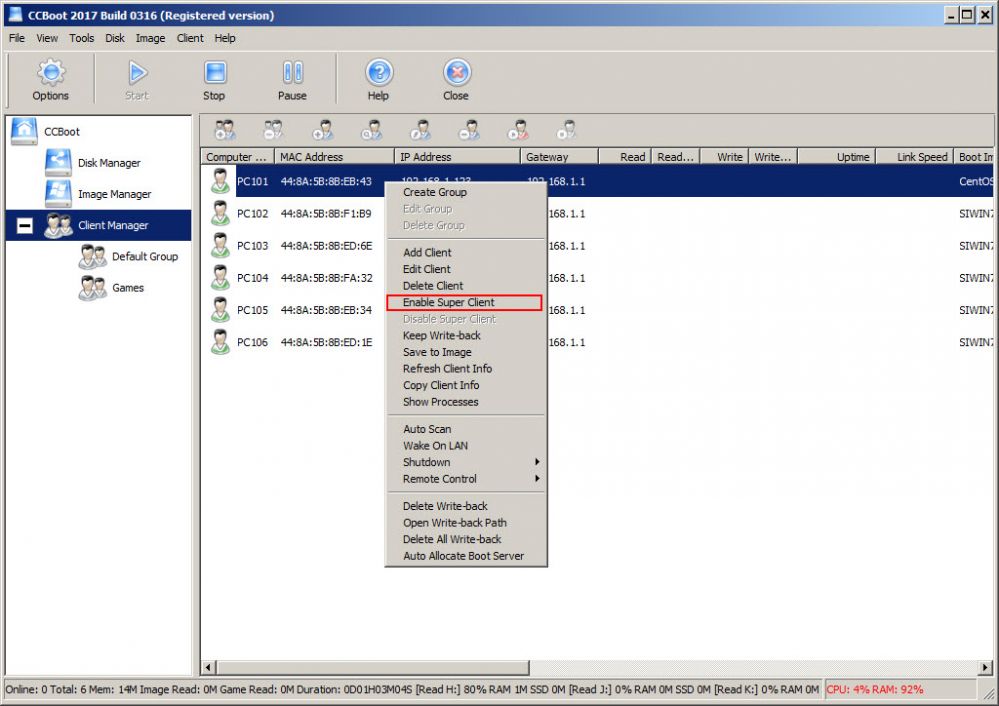
Figure 9
11. On "CCBoot Select Disk" windows, check the image file and click "OK" button (Figure 10).
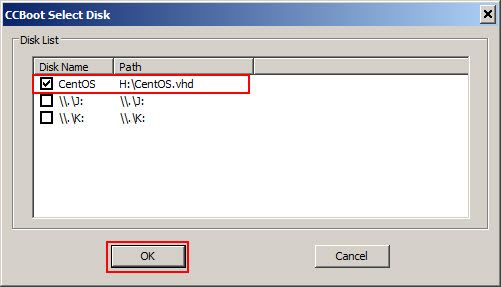
Figure 10
12. The PC is now in superclient mode (Figure 11)
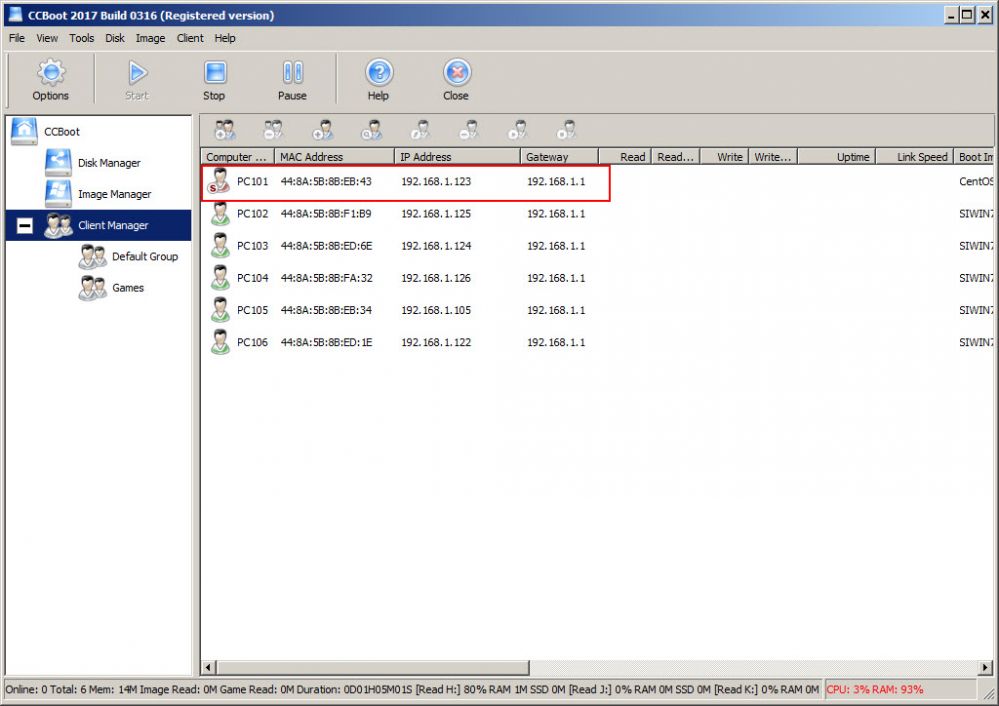
Figure 11
13. Now on the client pc, boot from Cent OS DVD or bootable USB drive.
Linux Diskless Installation and Image upload
If CCBoot Server Setup is completed, prepare the client to install the Linux Operating System. Please use CentOS-6.x-x86_64-bin-DVD1.iso to install. DO NOT use the LiveCD/LiveDVD edition.1) Linux installation interface (Figure 12).

2) Select the "Skip" button (Figure 13).

3) Click the "Next" button (Figure 14).

4) Select the installation language and click "Next" (Figure 15).

5) Select "specialized storage devices" radio button, and click the "Next" button (Figure 16).

6)Click "Add Advanced Target" button, the dialog box of "Advanced Storage Options" will pop up, and then select the "Add iSCSI target" radio button, and select the "Bind targets to network interfaces" check box, and then click "Add drive" button to go to the next step (Figure 17).

7) In the "Select Netword interface" dialog box, click the "OK" button (Figure 18).

8) In the "Network Connections" dialog box, click the "Close" button (Figure 19).

9) In the "Target IP Address" edit box, enter the server's IP address, and then click the "Start Discovery" button (Figure 20).

10) "iSCSI disk" initialization process (Figure 21).

11) After initialization, it will open a pop-up dialog box "iSCSI Discovered Nodes" dialog box, check the box next to the listed iscsi target "iqn.2008-12.com.CCBoot.141:00" check box, and then click the "Login" button (Figure 22).

12) In the pop-up "ISCSI Nodes Login" dialog box, click the "Login" button (Figure 23).

13) In the pop-up "ISCSI Login Results" dialog box, click the "OK" button, and then click the "Next" button (Figure 24).

14) In the pop-up "Storage Device Warning" dialog box, click "Yes, discard any data" button, to discarding all data (Figure 25).

15) After entering your computer name, click the "Next" button (Figure 26).

16) After you select the time zone, click the "Next" button (Figure 27).

17) Enter the "Root" login password, and then click the "Next" button (Figure 28).

18) Default settings; click the "next" button (Figure 29).

19) In the pop-up "Writing storage configuration to disk" dialog box, click the "Write changes to disk" button (Figure 30).

20) Select the version of the installed system ("Minimal" is a command version, the "Desktop" is a desktop version), click the "Next" button (Figure 31).

21) Linux Installation process (Figure 32).

22) After the installation is completed, click the "Reboot" button, to restart the Linux operating system, and now it has no disk (Figure 33).

23) Diskless boot one of the client PCs with super client.
24) Run the following commands.
[root@localhost ~]# /etc/init.d/NetworkManager stop
[root@localhost ~]# ntsysv
Disable Service Network Manager.
25) Run command as "[root@localhost ~]# nano /etc/udev/rules.d/70-persistent-net.rules" (Figure 34).
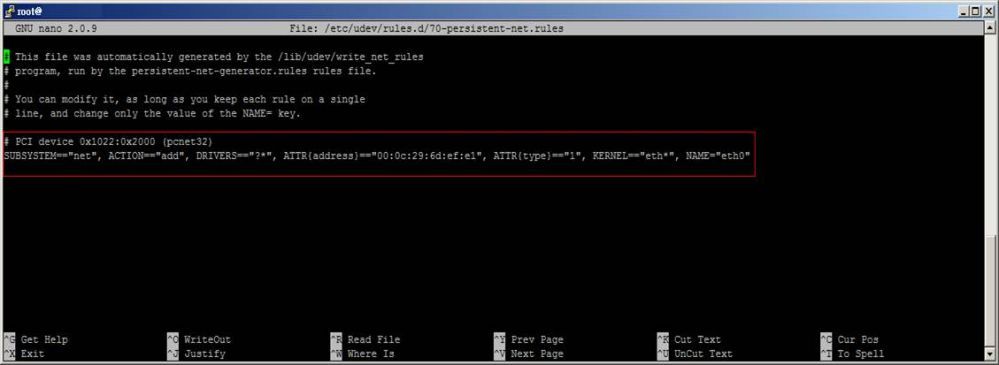
Figure 34
26) After modifying (Figure 35).
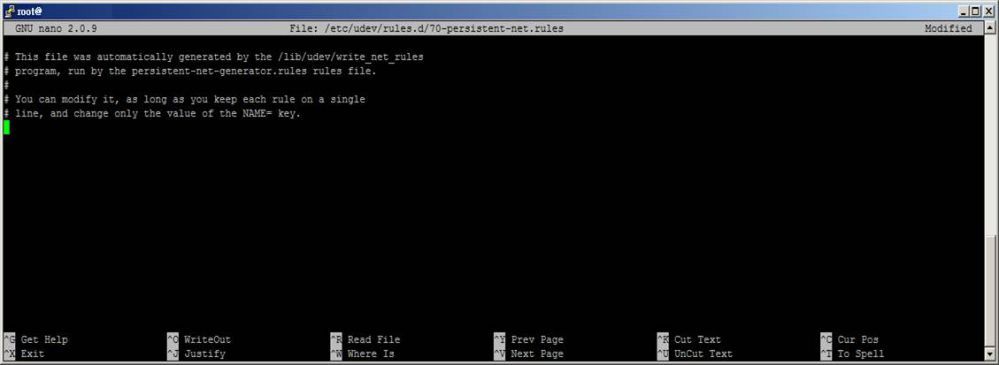
Figure 35
27) Run command as "nano /etc/sysconfig/network-scripts/ifcfg-eth0".
Keep these three lines (Figure 36).
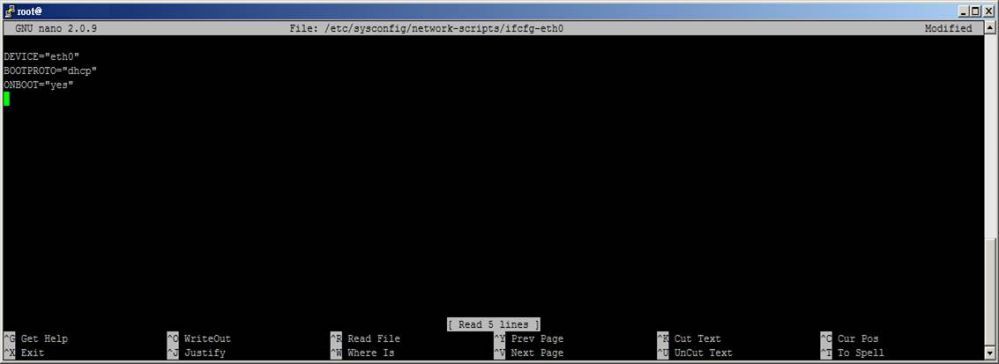
Figure 36
28) Run command as "nano /boot/grub/grub.conf" (Figure 37).
Delete part: ifname=eth0:00:50:56:29:02:18.
For example:
kernel /vmlinuz-2.6.32-431.el6.i686 ro root=/dev/mapper/vg_pc2-lv_root rd_NO_LUKS rd_LVM_LV=vg_pc2/lv_root netroot=iscsi:@11.11.11.207::3260:iface0:eth0::iqn.2005-02.com.ricecake.iscsi:00 ip=eth0:dhcp rd_NO_MDifname=eth0:00:50:56:29:02:18 SYSFONT=latarcyrheb-sun16 crashkernel=auto iscsi_initiator=iqn.1994-05.com.domain:01.f94652 KEYBOARDTYPE=pc KEYTABLE=us rd_LVM_LV=vg_pc2/lv_swap rd_NO_DM LANG=en_US.UTF-8 rhgb quiet
after Edited:
kernel /vmlinuz-2.6.32-431.el6.i686 ro root=/dev/mapper/vg_pc2-lv_root rd_NO_LUKS rd_LVM_LV=vg_pc2/lv_root netroot=iscsi:@11.11.11.207::3260:iface0:eth0::iqn.2005-02.com.ricecake.iscsi:00 ip=eth0:dhcp rd_NO_MD SYSFONT=latarcyrheb-sun16 crashkernel=auto iscsi_initiator=iqn.1994-05.com.domain:01.f94652 KEYBOARDTYPE=pc KEYTABLE=us rd_LVM_LV=vg_pc2/lv_swap rd_NO_DM LANG=en_US.UTF-8 rhgb quiet

Figure 37
29) After diskless booting Linux Operating System, enter the shutdown command "Poweroff" to safely turn off your computer (Figure 38).
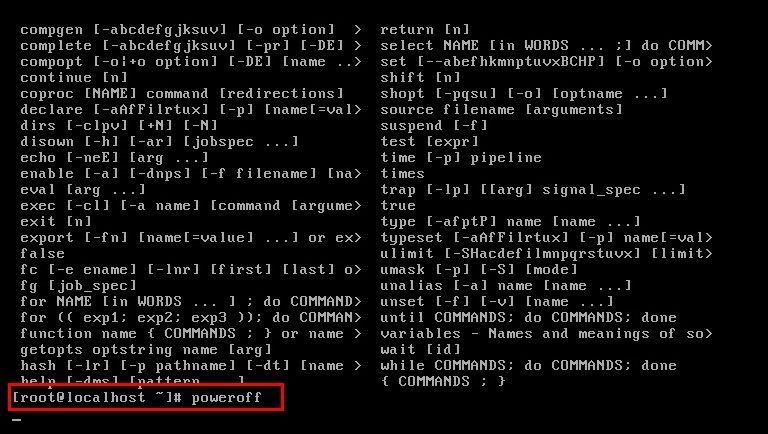
Figure 38
30) After the Linux client security is closed, go back to CCBoot server, and then disable "Super Client" for this PC and save to image directly without creating recovery points.
Client boot from linux OS
1) Turn on the a different client from the client that was used for installing the CentOS, the client will boot (Figure 39).

2) Once it starts to read the Linux OS data, will see the boot screen for Linux Cent OS (Figure 40).

3) Let it continue and get to the desktop (Figure 41).

4) Once, booted, login to Linux OS using the user name (user name is root) and password, you set during installation (Figure 42).

5) Now, Cent OS is fully loaded and logged in from CCBoot (Figure 43).

