Wiki Home Game issues anticheat disconnect issue
anticheat disconnect issue
2024-08-18
anticheat, disconnect, rust
Recently, when playing Rust or Fortnite, you may experience lag, freezing, or disconnection issues at startup. This could be due to the game's recent addition of the Easy Anti-Cheat system.
The anti-cheat system requires strict network components. If your image previously used PnP for different hardware, the network components may have become disorganized. To fix this, you'll need to rebuild the network. Follow the steps below to create a bootable USB with the existing image and rebuild the network system
1. Prepare a fast external removable USB disk. Avoid using a USB stick unless you're certain of its speed. We recommend using an external USB disk with an SSD inside. Ensure the disk has enough space for the VHD image file.
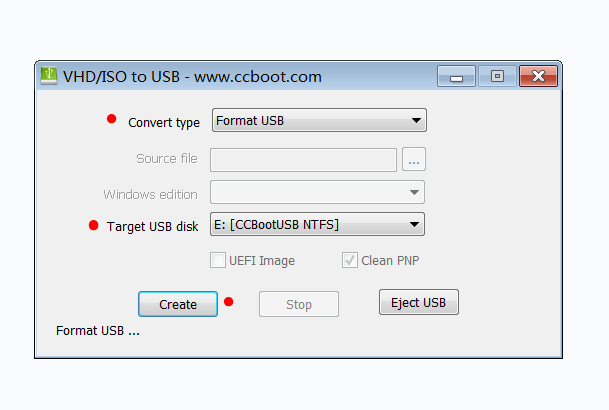
2. Format the disk as NTFS. You can run CCVHDUSB.exe in https://update.youngzsoft.com/icafecloud/update/ccvhdusb.zip, Select "Format USB" as the "Convert type", choose the correct USB disk, and click "Create" to proceed.
3. Merge all restore points of your image, then copy the final VHD file to the USB disk. Rename the file to "CCBoot.vhd".
4. Download https://update.youngzsoft.com/icafecloud/update/ccvhdusb.zip save it to USB disk and extract it.
5. Download the NIC driver installation program from the official website and save it to the USB disk.
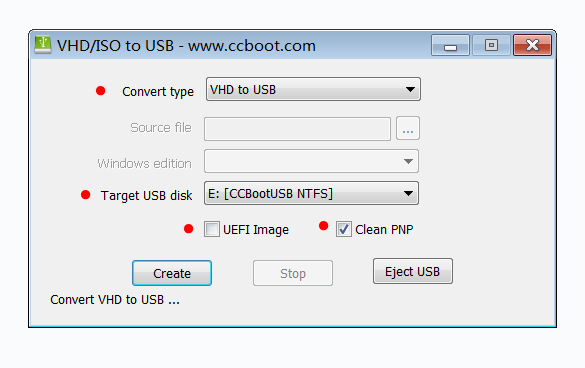
6. Insert the USB disk into the server and run CCVHDUSB.exe from the extracted folder. The program will automatically detect the USB disk. Select "VHD to USB" as the "Convert type", choose the correct USB disk, and check "UEFI Image" if your image uses UEFI. Also, check "Clean PNP". Finally, click "Create" to proceed.
7. Once the process is complete, click the “Eject USB” button to eject the USB disk. Set the client PC's BIOS boot priority to USB first, and boot the client using the USB disk. (Sometimes the Motherboard didn’t recognize the USB disk, reboot twice. If it still fails, please try another PC)
8. Go to Windows Settings -> Network & Internet -> click Network reset, then reboot. This will fully reinstall the network components.
9. After the reboot, run your NIC driver installation program.
10. Set a static IP for the network, then run C:\CCBootClient\CCBootClient.exe. Click "Install Client" in CCBootClient, and do not select any NIC in PnP.
11. Shutdown the client PC, then copy the CCBoot.vhd to the server (If the copying speed is slow, you can temporarily change the boot image path to the USB disk. After testing it thoroughly, you can then copy the image to your server). This VHD will be the fixed image for Fortnite. (Don’t forget to set the client PC BIOS back to PXE boot)
12. If you have different hardware PCs, run the USB on each one and repeat steps 9 and 10.