25.5 SuperCache method of installation
A.) Download SuperCache from http://cn.ccboot.com/download.htm SuperCache5.zip and extract to C: \. This installation package contains: setup.exe, zwt.nfo sscvf.sys, zwt.cer and zwt. ssc_scr2_key a total of five files.
B.) Click the "Start" -> "run" enter "CMD" run as administrator CMD, enter "bcdedit / set testsigning on." And hit Enter.
C.) Click the installation file setup.exe to install SuperCache if the installation is complete, you will be prompted to reboot, choose not to restart. Extract the package inside the sscvf.sys files over write the% windir% \ system32 \ drivers \ sscvf.sys.
D.) Double-click zwt.cer import a digital signature.
Restart the server, running on the desktop SuperCache management procedures to open the menu "File", select "Licensing," in the pop-up dialog box, click the "Update", select the extracted directory inside the zwt.ssc_scr2_key file, click Apply to Complete the installation.
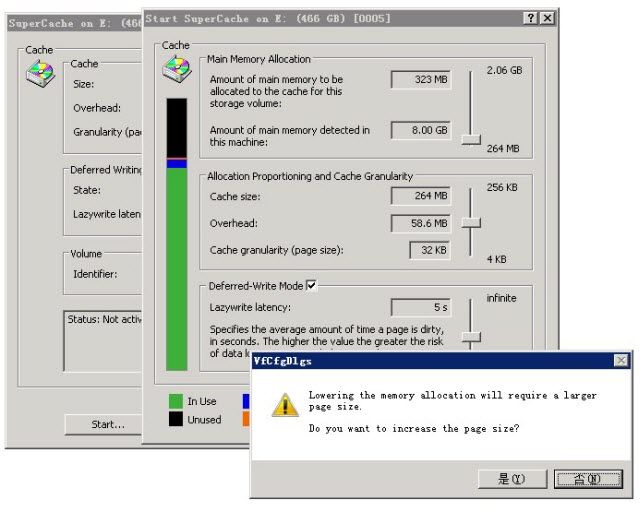
E.) In the write-back disk drive, right click, select "Properties", select "SuperCache", click on the "Cache" inside the dialog box, click the "Start", first check the Deferred-Write Mode ", and then "Cache Granularity (page size)" adjusted to 32KB, use the keyboard down key to adjust the "Main Memory Allocation" to a minimum (when the warning dialog, select "No", so the values is the minimum generally between 300-500MB). Shown below. After the parameter adjustment is completed, click "OK" button. Write-back disk J plate set in the same way.

Related links:
25.2 Server Bios SATA Configuration
25.4 Server Hard Disk Allocation
25.5 SuperCache method of installation
25.6 Server Network Optimization
25.7.1 Server read cache settings
25.7.2 Write-back disk SuperCache cache settings
25.8 Server’s Virtual Memory Management
25.9 The client's local cache settings
25.10 Clients Virtual Memory Management
25.11 System Restore Point Management
25.13 Client network optimization
25.14 System Patches Installation
25.15 Clear Windows 7 64bit Water Mark
